TextClassifier Usage#
This usage provides instructions on how to use the TextClassifier class from the hyfiml.models module for text classification tasks.
Installation#
You can install the hyfi-ml package using pip:
pip install hyfi-ml
Usage#
Step 1: Import the necessary modules#
from hyfiml import HyFI
from hyfiml.models import (
    CrossValidateConfig,
    DatasetConfig,
    TextClassifier,
    TrainingConfig,
)
/home/yjlee/.venvs/hyfi-ml/lib/python3.10/site-packages/tqdm/auto.py:21: TqdmWarning: IProgress not found. Please update jupyter and ipywidgets. See https://ipywidgets.readthedocs.io/en/stable/user_install.html
  from .autonotebook import tqdm as notebook_tqdm
Step 2: Initialize the HyFI project#
if HyFI.is_colab():
    HyFI.mount_google_drive()

h = HyFI.initialize(
    project_name="hyfi-ml",
    project_root=".",
    logging_level="INFO",
    verbose=True,
)

print("project_dir:", h.project.root_dir)
print("project_workspace_dir:", h.project.workspace_dir)
INFO:hyfi.utils.notebooks:Google Colab not detected.
INFO:hyfi.utils.notebooks:Extension autotime not found. Install it first.
INFO:hyfi.joblib.joblib:initialized batcher with <hyfi.joblib.batcher.batcher.Batcher object at 0x7fb0eda57d30>
INFO:hyfi.main.config:HyFi project [hyfi-ml] initialized
project_dir: /raid/data/yjlee/workspace/projects/hyfi-ml/book/usage
project_workspace_dir: /raid/data/yjlee/workspace/projects/hyfi-ml/book/usage/workspace
This step initializes the HyFI project and sets up the project directory and workspace directory.
Step 3: Load and preprocess the dataset#
data_dir = h.project.workspace_dir
raw_data = HyFI.load_dataframe("cointax.csv", data_dir)
raw_data.info()

import numpy as np

data = []
for polarity, rows in raw_data.to_dict().items():
    data += [
        dict(text=text, label="positive" if polarity == "긍정" else "negative")
        for text in rows.values()
        if text is not np.NaN and len(text) > 3
    ]

data = HyFI.records_to_dataframe(data)
data_file = str(data_dir / "cointax_data.parquet")
HyFI.save_dataframes(data, data_file)
data.tail()
<class 'pandas.core.frame.DataFrame'>
RangeIndex: 714 entries, 0 to 713
Data columns (total 2 columns):
 #   Column  Non-Null Count  Dtype
---  ------  --------------  -----
 0   긍정      478 non-null    object
 1   부정      236 non-null    object
dtypes: object(2)
memory usage: 11.3+ KB
INFO:hyfi.utils.datasets.save:Saving dataframe to /raid/data/yjlee/workspace/projects/hyfi-ml/book/usage/workspace/cointax_data.parquet
| text | label | |
|---|---|---|
| 680 | 소득과세가 너누 높다 | negative |
| 681 | 주식 거래세 수수료보다도 너무 높다고 생각하기에 | negative |
| 682 | 너무 심하다고 생각 | negative |
| 683 | ...... | negative |
| 684 | 수익의 20%는 너무 많다고 생각한다 | negative |
This step loads the raw data from a CSV file, preprocesses it by extracting the text and labels, and saves the processed data as a Parquet file.
Step 4: Create configurations for the TextClassifier#
dataset_config = DatasetConfig(
    dataset_name="parquet",
    data_files=data_file,
    train_split_name="train",
    test_split_name="test",
    text_column_name="text",
    label_column_name="label",
    load_data_split="train",
    test_size=0.2,
    dev_size=None,
    stratify_on=None,
    random_state=None,
    id2label={0: "negative", 1: "positive"},
)

training_config = TrainingConfig(
    output_dir="output",
    num_train_epochs=2,
    per_device_train_batch_size=16,
    per_device_eval_batch_size=16,
    warmup_steps=10,
    weight_decay=0.01,
    logging_dir="logs",
    logging_steps=10,
    evaluation_strategy="epoch",
    save_strategy="epoch",
    load_best_model_at_end=True,
    metric_for_best_model="accuracy",
)

cross_validate_config = CrossValidateConfig(
    n_splits=5,
    validation_size=0.1,
    random_state=42,
    shuffle=True,
)
This step creates instances of DatasetConfig, TrainingConfig, and CrossValidateConfig to configure the dataset, training, and cross-validation settings for the TextClassifier.
Step 5: Create an instance of TextClassifier#
classifier = TextClassifier(
    model_name="entelecheia/ekonbert-base",
    dataset_config=dataset_config,
    training_config=training_config,
    cross_validate_config=cross_validate_config,
)
This step creates an instance of the TextClassifier class with the specified configurations.
Step 6: Load the dataset and train the model#
dataset = classifier.load_dataset()
train_test_datasets = classifier.split_dataset(dataset)
train_dataset = train_test_datasets["train"]
classifier.train(train_dataset)
Generating train split: 685 examples [00:00, 330811.54 examples/s]
Map: 100%|██████████| 548/548 [00:00<00:00, 1290.55 examples/s]
Map: 100%|██████████| 548/548 [00:00<00:00, 137732.42 examples/s]
Some weights of BertForSequenceClassification were not initialized from the model checkpoint at entelecheia/ekonbert-base and are newly initialized: ['classifier.bias', 'classifier.weight']
You should probably TRAIN this model on a down-stream task to be able to use it for predictions and inference.
| Epoch | Training Loss | Validation Loss | Accuracy |
|---|---|---|---|
| 1 | 0.596100 | 0.556980 | 0.690909 |
| 2 | 0.430000 | 0.470387 | 0.754545 |
This step loads the dataset using the load_dataset method of the TextClassifier and trains the model using the train method.
Step 7: Make predictions on a new dataset#
test_dataset = train_test_datasets["test"]
predictions = classifier.predict(test_dataset)
print(predictions)
Map: 100%|██████████| 137/137 [00:00<00:00, 4642.12 examples/s]
Map: 100%|██████████| 137/137 [00:00<00:00, 31647.28 examples/s]
['positive', 'positive', 'positive', 'positive', 'negative', 'positive', 'positive', 'negative', 'positive', 'positive', 'positive', 'positive', 'negative', 'positive', 'positive', 'positive', 'positive', 'positive', 'positive', 'positive', 'positive', 'negative', 'positive', 'positive', 'positive', 'positive', 'positive', 'negative', 'positive', 'negative', 'positive', 'positive', 'positive', 'negative', 'negative', 'negative', 'positive', 'negative', 'positive', 'negative', 'negative', 'positive', 'positive', 'positive', 'negative', 'positive', 'positive', 'positive', 'positive', 'positive', 'positive', 'positive', 'negative', 'positive', 'positive', 'positive', 'negative', 'negative', 'positive', 'negative', 'negative', 'positive', 'positive', 'negative', 'positive', 'positive', 'positive', 'positive', 'positive', 'positive', 'positive', 'positive', 'positive', 'negative', 'positive', 'positive', 'positive', 'positive', 'negative', 'negative', 'positive', 'negative', 'positive', 'positive', 'positive', 'positive', 'positive', 'positive', 'positive', 'positive', 'positive', 'positive', 'positive', 'negative', 'positive', 'positive', 'negative', 'negative', 'positive', 'positive', 'positive', 'positive', 'positive', 'negative', 'negative', 'negative', 'positive', 'positive', 'positive', 'positive', 'positive', 'positive', 'negative', 'positive', 'positive', 'negative', 'positive', 'positive', 'positive', 'positive', 'positive', 'positive', 'negative', 'negative', 'negative', 'positive', 'positive', 'positive', 'negative', 'positive', 'positive', 'positive', 'positive', 'negative', 'positive', 'positive', 'positive']
This step loads a new dataset and makes predictions using the trained TextClassifier.
Step 8: Plot a confusion matrix#
labels = ["negative", "positive"]
classifier.plot_confusion_matrix(test_dataset, labels)
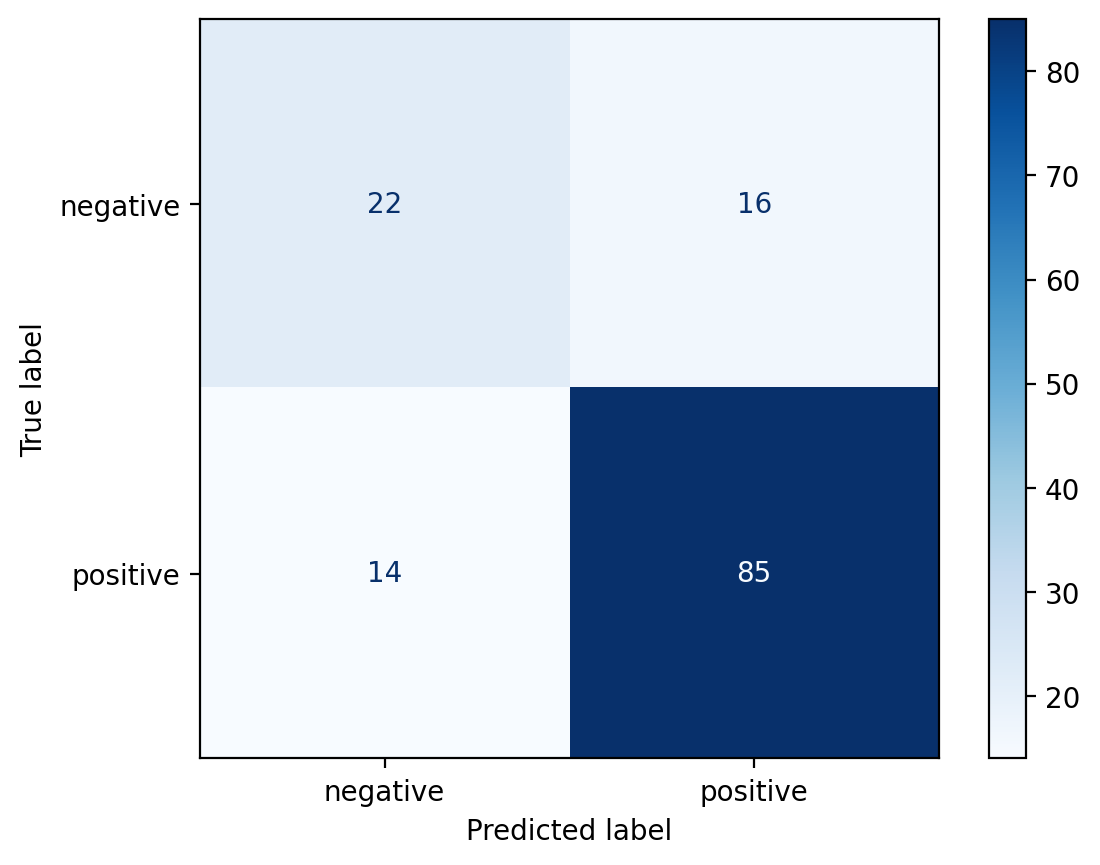
This step plots a confusion matrix using the plot_confusion_matrix method of the TextClassifier. It takes the new dataset and a list of labels as arguments.
Conclusion#
This usage provided a step-by-step guide on how to use the TextClassifier class from the hyfiml.models module for text classification tasks. It covered initializing the HyFI project, loading and preprocessing the dataset, creating configurations for the TextClassifier, creating an instance of the TextClassifier, training the model, making predictions, and plotting a confusion matrix.